Graphical Network Simulator (GNS3) 是一個網絡設備模擬器軟件,主要模擬 Cisco 的 Router、Switch 和 Firewall,對學習 Network 的朋友們確實是超大的喜訊,尤其是正在攻略 Cisco 考試的朋友們。筆者聽說過在沒有 GNS3 的年代,曾經有師兄為了學習 CCIE Lab,就花了十萬港元去購買一隻 Cisco 4503!現在我們真是很幸福了!
Category Archives: Network
Graphical Network Simulator (GNS3) 是一個網絡設備模擬器軟件,主要模擬 Cisco 的 Router、Switch 和 Firewall,對學習 Network 的朋友們確實是超大的喜訊,尤其是正在攻略 Cisco 考試的朋友們。筆者聽說過在沒有 GNS3 的年代,曾經有師兄為了學習 CCIE Lab,就花了十萬港元去購買一隻 Cisco 4503!現在我們真是很幸福了!
Need Help: L2TP Client Interface with shared secret key


SPINE: Poller[0] ERROR: Spine Timed Out While Processing Hosts Internal
http://blog.pnyet.web.id/2013/01/07/solved-error-spine-timed-out-while-processing-hosts-internal.html

[Solved] SPINE: Poller[0] ERROR: Spine Timed Out While Processing Hosts Internal
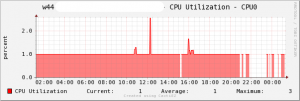
Few days ago I’ve a problem when installing cacti 0.8.8a, and only 3 devices that successfully graphed. My cacti running on CentOS 6.3 x86_64 with core i7 and 8GB ram, 240GB SSD and will used for populate about 3000 – 3500 data sources. First time I ran the cacti and everything work fine and I can add about 4 graphs on two devices and the graph is normal.
The problem come after generate about 300 graphs and the new graph doesn’t show. I got the following error message from cacti.log:
 01/02/2013 06:59:06 AM - SPINE: Poller[0] ERROR: Spine Timed Out
 While Processing Hosts Internal
 01/02/2013 06:59:06 AM - SPINE: Poller[0] ERROR: Spine Timed Out
 While Processing Hosts Internal
 01/02/2013 07:00:08 AM - SPINE: Poller[0] ERROR: Spine Timed Out
 While Processing Hosts Internal
 01/02/2013 07:00:08 AM - SPINE: Poller[0] ERROR: Spine Timed Out
 While Processing Hosts Internal
 01/02/2013 07:01:07 AM - SPINE: Poller[0] ERROR: Spine Timed Out
 While Processing Hosts Internal
 01/02/2013 07:01:07 AM - SPINE: Poller[0] ERROR: Spine Timed Out
 While Processing Hosts Internal
 01/02/2013 07:02:08 AM - SPINE: Poller[0] ERROR: Spine Timed Out
 While Processing Hosts Internal
 01/02/2013 07:02:08 AM - SPINE: Poller[0] ERROR: Spine Timed Out
 While Processing Hosts Internal
 01/02/2013 07:03:10 AM - SPINE: Poller[0] ERROR: Spine Timed Out
 While Processing Hosts Internal
 01/02/2013 07:03:10 AM - SPINE: Poller[0] ERROR: Spine Timed Out
 While Processing Hosts Internal
 01/02/2013 07:04:07 AM - SPINE: Poller[0] ERROR: Spine Timed Out
 While Processing Hosts Internal
After got the error log in above, I did the following steps:
1. Modify PHP execution time limit ini php.ini and change the maximum execution time from 60 second to 180 second
# vi php.ini
max_execution_time = 180
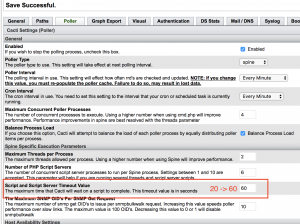
2. Increase script server time out value from 60 second to 180 or above depend on yours, go to cacti console enter to setting menu and then change “Script and Script Server Timeout Value” from 60 to 180 or above.
If two step in above doesn’t work
also try to modify mysql & php config.
How to change max_connections
You can change max_connections while MySQL is running via SET:
mysql> SET GLOBAL max_connections = 5000;
Query OK, 0 rows affected (0.00 sec)

mysql> SHOW VARIABLES LIKE "max_connections";
+-----------------+-------+
| Variable_name   | Value |
+-----------------+-------+
| max_connections | 5000  |
+-----------------+-------+
1 row in set (0.00 sec)
Technical Note: How to access natted server internally with Public IP address : Loopback policy
Products
| FortiGate v5.0 |
| FortiGate v5.2 |
Description
This article explains how to access the natted server internally with the Public IP/Virtual IP.
Solution
Step 1: Configure VIPLog in to the GUI and go to Policy & Objects > Objects > Virtual IPs > Create new, set the following parameters:
Name: Give any friendly name, for example: Virtual IP.
Interface: “Any”
External IP: “Public IP/Virtual IP of the Server”, for example: 1.1.1.1 (WAN1)
Mapped IP: “Private IP/Internal IP of the Server”, for example: 192.168.1.10
Port Forwarding needs to be checked if the port is to be specified.Step 2: Configure Policy
Incoming Interface : Wan1
Source Address : All
Outgoing Interface : Internal
Destination Address: Virtual IP
Service: HTTP (Specify the service to be used to access the server).Select Ok
If NAT is selected, the source address is changed to the internal interface address. Normally, you would not want to perform source NAT since this has the effect of hiding the actual source address of the sessions.
Step 3: Configure Policy Route
Router > Static > Policy route > Create new >
Incoming Interface: Internal (select the local LAN interface)
Source Address: Specify the Local LAN Network
Destination Address: Specify the VIP configured “LOCAL IP”
Outgoing Interface: Internal (select the VIP server’s local interface)
No Gateway is RequiredMove the created policy route to the top of existing policy route.


ref from: http://kb.fortinet.com/kb/microsites/search.do?cmd=displayKC&docType=kc&externalId=FD36657&sliceId=1&docTypeID=DT_KCARTICLE_1_1&dialogID=96206726&stateId=0%200%2096204818
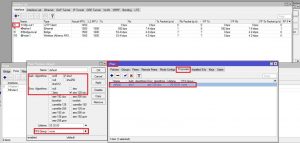
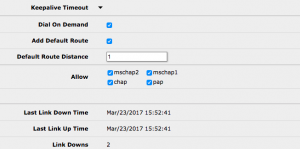
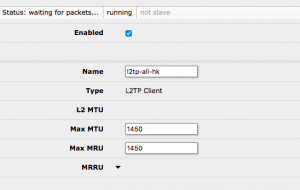
MikroTik RouterOS VPN (PPTP / L2TP / OpenVPN / SSTP / SSH Tunnel / IPSec)
/ip pool
add name=VPN_Pool ranges=192.168.88.100-192.168.88.150
add name=OVPN_Pool ranges=192.168.88.32/30
/ip ipsec peer
add enc-algorithm=aes-128,aes-192,aes-256 exchange-mode=main-l2tp generate-policy=port-override lifetime=8h passive=yes secret=自訂密鑰 send-initial-contact=no
/ppp profile
set [find name=default-encryption] dns-server=192.168.88.1 local-address=192.168.88.1 remote-address=VPN_Pool
add name=OpenVPN dns-server=192.168.88.1 local-address=192.168.88.32 remote-address=OVPN_Pool use-encryption=yes change-tcp-mss=yes
/ppp secret
add name=帳號 password=密碼 profile=default
refer by http://www.mobile01.com/topicdetail.php?f=110&t=4038861
Install Cacti (Network Monitoring) on RHEL/CentOS 7.x/6.x/5.x and Fedora 24-12
In this how-to we are going to show you how to install and setup complete network monitoring application called Cacti using Net-SNMP tool on RHEL/CentOS/Fedora.
Fortigate 60B 忘記密碼
久久沒開機的FG60B, 突然要借給別人使用,怎麼辦呢?
可以利用console 連接到設備
然後電源拔掉重新接上
登入帳號如下:
username: maintainer
password: bcpbFGT60B1234567890
密碼部分為: bcpb+序號(設備背面都有FGTXXXXXXX)
登入後
修改admin密碼的方法:
#config system admin
#edit admin
#set password [newpassword]
#end
#execute factoryreset
以網頁連到J-web的外部介面
http://md11boing.pixnet.net/blog/post/17097949-juniper-srx%E8%A8%AD%E5%AE%9A%E5%82%99%E5%BF%98
nginx+nginx-rtmp-module+ffmpeg搭建流媒体服务器
Nginx本身是一个非常出色的HTTP服务器,FFMPEG是非常好的音视频解决方案.这两个东西通过一个nginx的模块nginx-rtmp-module,组合在一起即可以搭建一个功能相对比较完善的流媒体服务器.
这个流媒体服务器可以支持RTMP和HLS(Live Http Stream)
从安装开始
Nginx的安装参照我之前的这个: http://blog.csdn.net/redstarofsleep/article/details/45092127
不同的是在configure的时候需要增加nginx-rtmp-module的支持,下载好nginx-rtmp-module后解压,然后nginx安装时增加这个模块(–add-module),其它都是一样的.
- ./configure –prefix=/usr/local/nginx –with-pcre=/home/user/pcre/pcre-8.32 –with-zlib=/home/user/zlib/zlib-1.2.8 –with-openssl=/home/user/openssl/openssl-1.0.1i –add-module=/home/user/nginx-rtmp-module
FFMPEG的安装参照上一篇: http://blog.csdn.net/redstarofsleep/article/details/45092145
nginx配合ffmpeg做流媒体服务器的原理是: nginx通过rtmp模块提供rtmp服务, ffmpeg推送一个rtmp流到nginx, 然后客户端通过访问nginx来收看实时视频流. HLS也是差不多的原理,只是最终客户端是通过HTTP协议来访问的,但是ffmpeg推送流仍然是rtmp的.

安装完成后,打开Nginx的配置文件nginx.conf进行配置
首先在里面加入rtmp的配置
- rtmp {
- server {
- listen 1935;
- application myapp {
- live on;
- }
- application hls {
- live on;
- hls on;
- hls_path /tmp/hls;
- }
- }
- }
然后,针对hls,还需要在http里面增加一个location配置
- location /hls {
- types {
- application/vnd.apple.mpegurl m3u8;
- video/mp2t ts;
- }
- root /tmp;
- add_header Cache-Control no-cache;
- }
这是一个最简单,最基础的配置, rtmp监听1935端口,如果是hls的话用hls on开启hls,并且为hls设置一个临时文件目录hls_path /tmp/hls; 其它更高级的配置可以参看nginx-rtmp-module的readme,里面有比较详细的介绍其它的配置,并且它还提供了一个通过JWPlayer在网页上播放的例子.
保存完配置文件后,启动nginx,通过netstat -ltn命令可以看到增加了一个1935端口的监听.8080是nginx默认的http监听端口.
- # netstat -ltn
- Active Internet connections (only servers)
- Proto Recv-Q Send-Q Local Address Foreign Address State
- tcp 0 0 127.0.1.1:53 0.0.0.0:* LISTEN
- tcp 0 0 0.0.0.0:22 0.0.0.0:* LISTEN
- tcp 0 0 127.0.0.1:631 0.0.0.0:* LISTEN
- tcp 0 0 0.0.0.0:1935 0.0.0.0:* LISTEN
- tcp 0 0 0.0.0.0:8080 0.0.0.0:* LISTEN
- tcp6 0 0 :::22 :::* LISTEN
- tcp6 0 0 ::1:631 :::* LISTEN
然后用ffmpeg推流到nginx:
第一个是推到了上面配置的myapp上:
- ffmpeg -re -i “D:downloadfilmaqgy�2.mp4” -vcodec libx264 -vprofile baseline -acodec aac
- -ar 44100 -strict –2 -ac 1 -f flv -s 1280×720 -q 10 rtmp://server:1935/
- myapp/test1
第二个推送到hls上:
- ffmpeg -re -i “D:downloadfilmaqgy�2.mp4” -vcodec libx264 -vprofile baseline -acodec aac
- -ar 44100 -strict –2 -ac 1 -f flv -s 1280×720 -q 10 rtmp://ip:1935/
- hls/test2
现在我们的流媒体服务器有两个实时流了,一个是rtmp的,另一个是hls的,用流媒体播放器播放一下,流媒体播放器可以用vlc也可以用ffmpeg带的ffplay.手机也是可以播放的.
上面这两个流的地址分别是:
第一个就是推送的地址: rtmp://serverIp:1935/myapp/test1
第二个是HTTP地址: http://serverIp:8080/hls/test2.m3u8
最后贴上一段对于HLS这个比较特殊的流媒体协议的解释:
(这段解释来自: http://www.cnblogs.com/haibindev/archive/2013/01/30/2880764.html)
HTTP Live Streaming(HLS)是苹果公司(Apple Inc.)实现的基于HTTP的流媒体传输协议,可实现流媒体的直播和点播,相对于常见的流媒体直播协议,例如RTMP协议、RTSP协议、MMS协议等,HLS直播最大的不同在于,直播客户端获取到的,并不是一个完整的数据流。HLS协议在服务器端将直播数据流存储为连续的、很短时长的媒体文件(MPEG-TS格式),而客户端则不断的下载并播放这些小文件,因为服务器端总是会将最新的直播数据生成新的小文件,这样客户端只要不停的按顺序播放从服务器获取到的文件,就实现了直播。由此可见,基本上可以认为,HLS是以点播的技术方式来实现直播。由于数据通过HTTP协议传输,所以完全不用考虑防火墙或者代理的问题,而且分段文件的时长很短,客户端可以很快的选择和切换码率,以适应不同带宽条件下的播放。不过HLS的这种技术特点,决定了它的延迟一般总是会高于普通的流媒体直播协议。
refer by http://blog.csdn.net/redstarofsleep/article/details/45092147