Category Archives: Linux

使用 shell script 刪除 cloudflare 上的快取

1.先取得 domain name 的 ID

curl -X GET "https://api.cloudflare.com/client/v4/zones?name=網址" \
# -H "X-Auth-Email: test@gmail.com" \
# -H "X-Auth-Key: 7b9fb4xxxxxxxxxxxxxxxxxxxxxxxxxx" \
# -H "Content-Type: application/json" \

X-Auth-Email: 使用帳號
X-Auth-Key: API KEY 在 My settings 裡面可以查看

2.執行後會取得一連串的 json 字串、可以用線上 JSON檢視工具 直接看

3.取得後寫成shell script執行就好了

curl -X DELETE "https://api.cloudflare.com/client/v4/zones/e74b73xxxxxxxxxxxxxxxxxxxxxxxxxx/purge_cache" \
-H "X-Auth-Email: test@gmail.com" \
-H "X-Auth-Key: 7b9fb4xxxxxxxxxxxxxxxxxxxxxxxxxx" \
-H "Content-Type: application/json" \
--data '{"purge_everything":true}'

linux error . : backlog limit exceeded

此文完整連結 http://n.zipko.info/601.html
文章歡迎轉載,請尊重版權註明連結來源。

linux 的 audit 服務

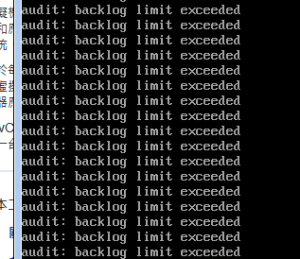
Linux 的 audit (in Redhat, Suse) 服務是什麼?以前我也不會去注意,直到有一天系統 crash,不知道為什麼,打開 Monitor,只出現一堆這樣的訊息:

audit: audit_backlog=326 > audit_backlog_limit=320
audit: audit_lost=39095317 audit_rate_limit=0 audit_backlog_limit=320
audit: backlog limit exceeded

這也許不是 crash 的主因,不過先解決吧,下面是 FedoraForum 的建議:

It means that you are getting flooded with audit events. You can increase the audit daemon’s priority to make sure it has enough run time to empty its
queue or lengthen the backlog.

才引起我的注意,因此來研究一下 audit。

1. 什麼是 audit ?

Linux 系統中已經 syslog 了,syslog 會記錄系統狀態、如硬體的警告或應用軟體的記錄等。但是syslog屬於應用層,且僅只於此一應用而已,沒辦法記錄太多資訊。因此,audit 誕生以取代 syslog 的責任,來記錄核心層的事件:檔案的讀寫、系統呼叫、權限的狀態等。

2. 來看看 audit 運作的流程(圖片取自參考資料4)

Audit Daemon 運作和一般的daemon 一樣,運作後會引入selinux的系統。

3. audit 有三個操作的工具

audit 可用的三個指令:

=> auditctl – 控制 kernel audit system,能取得狀態,增或刪除rules、設定某個檔案的「檢視」(watch)。

=> ausearch – 用來查詢 audit logs 的工具。

=> aureport – 產生 audit 系統簡報的工具。

4. 設定檔

audit 的設定檔為 /etc/audit/audit.rules,主要分為三種類別:

• Basic audit system parameters
• File and directory watches
• System call audits

# basic audit system parameters
-D    (刪除舊記錄,預設-D)
-b 8192  (buffer大小,預設256,改為8192)
-f 1  (失敗控制旗標,可設為 0 (silent), 1 (印出錯誤,預設), and 2 (panic, 把系統關閉—非正常關閉,所以會有資料遺失的風險).
-e 1 (生失效,0為失效,1為生效(預設)
# some file and directory watches
-w /var/log/audit/   (觀查目錄 /var/log/audit/)
-w /etc/auditd.conf -p rxwa    (觀查檔案 /etc/auditd.conf,-p 設定權限為rxw及a屬性變更)
-w /etc/audit.rules -p rxwa
-w /etc/passwd -p rwxa
-w /etc/sysconfig/
# an example system call rule
-a entry,always -S umask

對於設定檔有幾點要說明:
• 目錄觀察的詳細度比檔案觀察低
• 無法使用任何的pathname globbing,如?或*
• 只能設定已存在的檔案,若設定觀察目錄而有新增檔案,新檔案只會在下次 audit 重啟後才會加入

利用 -k 產生 key string,以供ausearch 直接索引
-w /etc/var/log/audit/ -k LOG_audit

5. 操作實務

重啟 auditd
# service auditd restart

更新 auditd
# yum update audit

檢查檔案及系統的更動狀態
# aureport –start today –event –summary -i

查詢單一檔案
# ausearch -f filename

利用 -ts 指定日期 -k 指定 key string,其中password-file 使用 auditctl -k 來產生。
# ausearch -ts today -k password-file
# ausearch -ts 3/12/07 -k password-file

-ui 來指定 user name (UID),例如找出  (uid 506) 的操作
# ausearch -ts today -k password-file -x rm -ui 506
# ausearch -k password-file -ui 506

[參考資料]

1. FedoraForum.org http://forums.fedoraforum.org/showthread.php?t=213680

2. 檢查誰修改檔的動作 http://www.cyberciti.biz/tips/linux-audit-files-to-see-who-made-changes-to-a-file.html

3. Linux Audit Quick Start SUSE Linux Enterprise 10 SP1 http://www.novell.com/documentation/sled10/pdfdoc/auditqs_sp2/auditqs_sp2.pdf

4. The Linux Audit Subsystem Deep Dive http://linuxvm.org/present/SHARE113/S9203sw.pdf


http://note-end.zipko.info/601.html

YUM错误:ERROR: XZ COMPRESSION NOT AVAILABLE

今天在一台新的CentOS6服务器上配置PHP环境,用yum的方式安装,碰到问题了:

Error: xz compression not available

问题是这样来的,我参照我之前的博文安装步骤执行:《CentOS7下yum安装PHP5.6》,直到出现错误,才想起原来我当前的系统是CentOS6的!都是粗心惹的祸:-(

网上找到了解决的方法,即移除新版的epelrelease:

最好执行clean,有一次就是没执行,留有了缓存,被摆了一道。然后重新再安装6.x版本的epelrelease


申請 Let’s Encrypt 免費憑證讓網站支援 HTTP2

Letsencrypt

寫這篇最主要推廣讓網站都支援 HTTPS 加密連線及 HTTP2 協定,對於網站為什麼要支援 HTTP2,可以直接參考 ihower 寫的說明文章,最近在玩 Facebook, Line, Telegram Bot 時,填寫 Webhook URL,都強制要填寫 https:// 開頭,所以更不能忽略 HTTPS 了。,去年底寫了一篇 Let’s Encrypt 開放申請免費 SSL 憑證 推廣 Let’s Encrypt 的貢獻,讓買不起憑證,又想玩看看 HTTP2 的開發者可以用很簡單的方式來安裝及自動更新憑證,而 gslin 大為了推廣 HTTPS 也做了一個網站教學,文章寫得相當清楚,支援 Apache 及 Nginx 設定。

安裝方式

如果主機是使用 Amazone EC2,可以直接用 AWS Certificate Manager,用 AWS 的好處就是只要透過後台介面搭配 ELB 就可以直接設定好 HTTPS 對應到 EC2 主機,壞處就是直接被綁死,將來如果不要使用 AWS,要轉移機器會相當痛苦。所以本篇會紀錄如何用 Nginx 搭配 Let’s Encrypt。為了方便部署機器,我們選用 dehydrated 來設定 Let’s Encrypt,好處就是不用安裝 Python 套件,官方網站提供的安裝方式需要安裝 Python 相關環境。透過 wget 將 dehydrated 安裝到 /etc/dehydrated/ 底下

01
02
03
$ mkdir -p /etc/dehydrated/
$ wget https://raw.githubusercontent.com/lukas2511/dehydrated/master/dehydrated -O /etc/dehydrated/dehydrated
$ chmod 755 /etc/dehydrated/dehydrated

建立設定檔

建立 dehydrated config 設定檔

01
02
$ echo "WELLKNOWN=/var/www/dehydrated" > /etc/dehydrated/config
$ mkdir -p /var/www/dehydrated

Nginx 設定,先在 80 port 的 Server section 內寫入底下設定:

01
02
03
location /.well-known/acme-challenge/ {
  alias /var/www/dehydrated/;
}

可以先丟個檔案到 /var/www/dehydrated/ 確定網站可以正常讀取檔案,接著透過 dehydrated 指令產生 SSL 設定檔

01
$ /etc/dehydrated/dehydrated -c -d fbbot.wu-boy.com

執行上述指令會看到底下結果

01
02
03
04
05
06
07
08
09
10
11
12
13
# INFO: Using main config file /etc/dehydrated/config
Processing fbbot.wu-boy.com
 + Signing domains...
 + Generating private key...
 + Generating signing request...
 + Requesting challenge for fbbot.wu-boy.com...
 + Responding to challenge for fbbot.wu-boy.com...
 + Challenge is valid!
 + Requesting certificate...
 + Checking certificate...
 + Done!
 + Creating fullchain.pem...
 + Done!

最後在設定一次 nginx

01
02
03
04
05
06
07
08
09
10
11
12
13
14
15
16
17
18
19
20
21
22
23
24
25
server {
  # don't forget to tell on which port this server listens
  listen 80;
  # listen on the www host
  server_name fbbot.wu-boy.com;
  # and redirect to the non-www host (declared below)
  return 301 https://fbbot.wu-boy.com$request_uri;
}
server {
  listen 0.0.0.0:443 ssl http2;
  server_name fbbot.wu-boy.com;
  location /.well-known/acme-challenge/ {
    alias /var/www/dehydrated/;
  }
  ssl_certificate /etc/dehydrated/certs/fbbot.wu-boy.com//fullchain.pem;
  ssl_certificate_key /etc/dehydrated/certs/fbbot.wu-boy.com/privkey.pem;
  location / {
    proxy_pass http://localhost:8081;
  }
}

上面是將 80 port 自動轉到 https,如果下次要重新 renew 的時候才不會又要打開 80 port 一次。

加入 Cron 設定

每天半夜可以自動 renew 一次,請參考 https://letsencrypt.tw/ 最後章節

01
0 0 * * * root sleep $(expr $(printf "\%d" "0x$(hostname | md5sum | cut -c 1-8)") \% 86400); ( /etc/dehydrated/dehydrated -c -d fbbot.wu-boy.com; /usr/sbin/service nginx reload ) > /tmp/dehydrated-fbbot.wu-boy.com.log 2>&1

後記

除了這方法之外,也可以使用 Certbot 來自動更新憑證,但是這方式就是要安裝 Python 環境,不過也不是很難就是了,可以直接參考這篇『NGINX 使用 Let’s Encrypt 免費 SSL 憑證設定 HTTPS 安全加密網頁教學』。結論就是你可以在網路上找到超多種方法來申請 Let’s Encrypt 憑證,就找到自己覺得不錯的方法即可,而我是認為不用安裝 Python 環境的方式最適合部署了。


refer by https://blog.wu-boy.com/2016/10/website-support-http2-using-letsencrypt/

[程式泥沼中打滾] – phpMyAdmin 大型 MySQL 檔案匯入解決方案 @ 豚丸の硬いブログ :: 痞客邦 PIXNET ::

在 php 中有設定最大上傳檔案大小 如果想上傳較大的 *.sql 檔案 phpMyAdmin 會有錯誤跳出,不允許上傳檔案 在這種情況以 phpMyAdmin 內建的功能我們有兩種解決方案: (

Source: [程式泥沼中打滾] – phpMyAdmin 大型 MySQL 檔案匯入解決方案 @ 豚丸の硬いブログ :: 痞客邦 PIXNET ::

How to change visudo editor from nano to vim?

Type sudo update-alternatives --config editor

You will get a text like below.

There are 4 choices for the alternative editor (providing /usr/bin/editor).

  Selection    Path                Priority   Status
------------------------------------------------------------
* 0            /bin/nano            40        auto mode
  1            /bin/ed             -100       manual mode
  2            /bin/nano            40        manual mode
  3            /usr/bin/vim.basic   30        manual mode
  4            /usr/bin/vim.tiny    10        manual mode

Press enter to keep the current choice[*], or type selection number: 3

Find vim.basic or vim.tiny selection number. Type it and press enter. Next time when you open visudo your editor will be vim

SPINE: Poller[0] ERROR: Spine Timed Out While Processing Hosts Internal

http://blog.pnyet.web.id/2013/01/07/solved-error-spine-timed-out-while-processing-hosts-internal.html


cacti_host_internal

[Solved] SPINE: Poller[0] ERROR: Spine Timed Out While Processing Hosts Internal

cacti_host_internalFew days ago I’ve a problem when installing cacti 0.8.8a, and only 3 devices that successfully graphed. My cacti running on CentOS 6.3 x86_64 with core i7 and 8GB ram, 240GB SSD and will used for populate about 3000 – 3500 data sources. First time I ran the cacti and everything work fine and I can add about 4 graphs on two devices and the graph is normal.

The problem come after generate about 300 graphs and the new graph doesn’t show. I got the following error message from cacti.log:

 01/02/2013 06:59:06 AM - SPINE: Poller[0] ERROR: Spine Timed Out 
 While Processing Hosts Internal
 01/02/2013 06:59:06 AM - SPINE: Poller[0] ERROR: Spine Timed Out
 While Processing Hosts Internal
 01/02/2013 07:00:08 AM - SPINE: Poller[0] ERROR: Spine Timed Out
 While Processing Hosts Internal
 01/02/2013 07:00:08 AM - SPINE: Poller[0] ERROR: Spine Timed Out
 While Processing Hosts Internal
 01/02/2013 07:01:07 AM - SPINE: Poller[0] ERROR: Spine Timed Out
 While Processing Hosts Internal
 01/02/2013 07:01:07 AM - SPINE: Poller[0] ERROR: Spine Timed Out
 While Processing Hosts Internal
 01/02/2013 07:02:08 AM - SPINE: Poller[0] ERROR: Spine Timed Out
 While Processing Hosts Internal
 01/02/2013 07:02:08 AM - SPINE: Poller[0] ERROR: Spine Timed Out
 While Processing Hosts Internal
 01/02/2013 07:03:10 AM - SPINE: Poller[0] ERROR: Spine Timed Out 
 While Processing Hosts Internal
 01/02/2013 07:03:10 AM - SPINE: Poller[0] ERROR: Spine Timed Out 
 While Processing Hosts Internal
 01/02/2013 07:04:07 AM - SPINE: Poller[0] ERROR: Spine Timed Out
 While Processing Hosts Internal

After got the error log in above, I did the following steps:

1. Modify PHP execution time limit ini php.ini and change the maximum execution time from 60 second to 180 second
# vi php.ini
max_execution_time = 180

2. Increase script server time out value from 60 second to 180 or above depend on yours, go to cacti console enter to setting menu and then change “Script and Script Server Timeout Value” from 60 to 180 or above.

If two step in above doesn’t work

also try to modify mysql & php config.

How to change max_connections

You can change max_connections while MySQL is running via SET:

mysql> SET GLOBAL max_connections = 5000;
Query OK, 0 rows affected (0.00 sec)

mysql> SHOW VARIABLES LIKE "max_connections";
+-----------------+-------+
| Variable_name   | Value |
+-----------------+-------+
| max_connections | 5000  |
+-----------------+-------+
1 row in set (0.00 sec)