這裡介紹如何使用 screen 指令來操控 UNIX/Linux 的終端機,讓工作更有效率。 screen 指 …
來源: 使用 Screen 指令操控 UNIX/Linux 終端機的教學與範例 – G. T. Wang
*** script sample ***
echo “please input baud rate:”
echo “9600,14400,19200,38400…”
read baud
screen /dev/cu.usbserial ${baud}
這裡介紹如何使用 screen 指令來操控 UNIX/Linux 的終端機,讓工作更有效率。 screen 指 …
來源: 使用 Screen 指令操控 UNIX/Linux 終端機的教學與範例 – G. T. Wang
*** script sample ***
echo “please input baud rate:”
echo “9600,14400,19200,38400…”
read baud
screen /dev/cu.usbserial ${baud}
| FortiGate v5.0 |
| FortiGate v5.2 |
This article explains how to access the natted server internally with the Public IP/Virtual IP.
Step 1: Configure VIPLog in to the GUI and go to Policy & Objects > Objects > Virtual IPs > Create new, set the following parameters:
Name: Give any friendly name, for example: Virtual IP.
Interface: “Any”
External IP: “Public IP/Virtual IP of the Server”, for example: 1.1.1.1 (WAN1)
Mapped IP: “Private IP/Internal IP of the Server”, for example: 192.168.1.10
Port Forwarding needs to be checked if the port is to be specified.Step 2: Configure Policy
Incoming Interface : Wan1
Source Address : All
Outgoing Interface : Internal
Destination Address: Virtual IP
Service: HTTP (Specify the service to be used to access the server).Select Ok
If NAT is selected, the source address is changed to the internal interface address. Normally, you would not want to perform source NAT since this has the effect of hiding the actual source address of the sessions.
Step 3: Configure Policy Route
Router > Static > Policy route > Create new >
Incoming Interface: Internal (select the local LAN interface)
Source Address: Specify the Local LAN Network
Destination Address: Specify the VIP configured “LOCAL IP”
Outgoing Interface: Internal (select the VIP server’s local interface)
No Gateway is RequiredMove the created policy route to the top of existing policy route.
When URLs are just not resolving the way you want it, to time to clear or flush the dns nameserver local cache –
macOS Sierra 10.12.0
sudo killall -HUP mDNSResponder
OSX 10.11.0
sudo killall -HUP mDNSResponder
OSX 10.10.4
sudo killall -HUP mDNSResponder
OSX 10.10.0 – 10.10.3
sudo discoveryutil mdnsflushcache
OSX 10.9 – 10.8 – 10.7
sudo killall -HUP mDNSResponder
OSX 10.5 – 10.6
sudo dscacheutil -flushcache
Windows
ipconfig /flushdns
Linux (depending on what you’re running)
/etc/init.d/named restart
/etc/init.d/nscd restart
在預設的PHP環境下,是沒有對microsoft sql server支援連線功能的,因此我們需要進行套件的安裝與啟用。
但是在Centos環境下,預設是無法安裝mssql套件的,因此我們需要擴充套件庫來支援,例如Epel。如果安裝Epel,可以參考這篇文章(連結)。
1.安裝php-mssql套件
sudo yum install php-mssql
2.修改php.ini
vim /etc/php.ini
3.在php.ini設定檔中,啟用mssql設定
…
//如果有此行,將前方註解取消;沒有則新增此行
extension=mssql.so
…
4.重啟php來載入新的設定
sudo service php-fpm restart
5.用下面這段程式碼測試,顯示OK代表測試連線成功。
<?php
$link = mssql_connect(“yourserver”, “yourusername”, “yourpassword”);
if (!$link)
    die(“Unable to connect!”);
else
    echo(“OK”);
?>
參考資源:
https://davejamesmiller.com/blog/connecting-php-to-microsoft-sql-server-on-linux
http://serverfault.com/questions/387661/install-php-mssql-in-centos-6-2
http://blog.kkbruce.net/2012/10/microsoft-sql-server-2012-express-donwload-and-install.html#.WASDUpN97-Y
In this how-to we are going to show you how to install and setup complete network monitoring application called Cacti using Net-SNMP tool on RHEL/CentOS/Fedora.
在 Windows Server 2008 之前的作業系統都可以允許單一帳戶從遠端桌面登入多個 Session (工作階段),但是到了 Windows Server 2008 以後 ( 包含 Windows Server 2008 R2 ) 已經改變了預設行為,現在��預設改為限制終端機服務的使用者只能使用一個遠端工作階段,若要修正此功能必須要開啟本機群組原則編輯器才能修正,以下為修改設定的步驟。
1. 開啟 本機群組原則編輯器 (gpedit.msc)

2. 瀏覽至以下路徑,並在右側選單修改限制終端機服務的使用者只能使用一個遠端工作階段:
電腦設定 / 系統管理範本 / Windows 元件 / 終端機服務 / 終端機伺服器 / 連線

3. 最後將該項目設定為停用即可

除了上述方法以外,在 Windows Server 2008 或 Windows Server 2008 R2 也有另一個方法可以設定,但設定的名稱不太一樣,分別講解如下:
Windows Server 2008 的開啟方式
[開始] / 系統管理工具 / 終端機服務 / 終端機服務設定

Windows Server 2008 R2 的開啟方式
[開始] / 系統管理工具 / 遠端桌面服務 / 遠端桌面工作階段主機設定
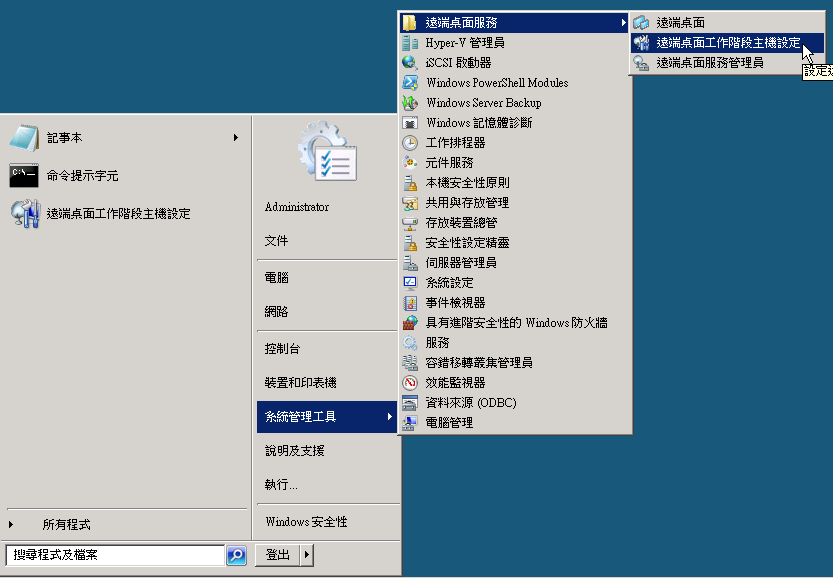
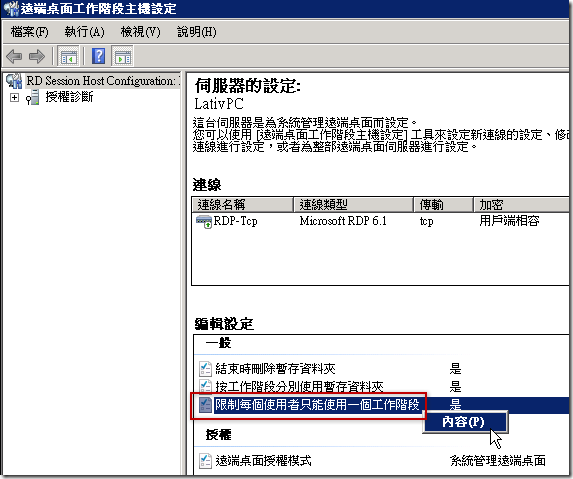
開啟之後可以直接在右邊看到限制每個使用者只能使用一個工作階段的設定值,按下滑鼠右鍵選「內容」即可進行設定變更:
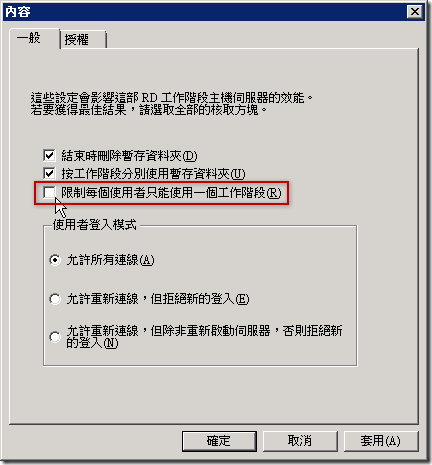
最後將限制每個使用者只能使用一個工作階段勾選項目取消,再按下 [確定] 即可設定完成
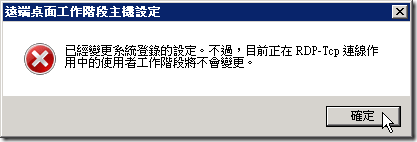
不過如果你在遠端桌面連線時做這個操作會出現以下錯誤畫面,不過並不會影響設定的套用:
相關連結
ref by : http://blog.miniasp.com/post/2010/07/26/Restrict-each-user-to-a-single-session-disable.aspx
進入 DFU 模式教學的第一種方法 (請先看淸楚以下步驟)
1.1.) 開啟 iOS 主機, 並連接主機至 iTunes.
1.2.) 首先同時按着主目錄鍵及電源開關鍵.
1.3.) 至 iOS 主機被強制關機後, 放開電源開關鍵.
1.4.) 繼續維持按着主目錄鍵約 10 秒鐘.
1.5.) iTunes 將認出在 DFU 模式的主機, 按確定後即完成.
注意事項
由步驟 1.2 起, 須長按主目錄制直至步驟 1.5 完成才好放開. 另外, 進入 DFU 模式後及按回復之前, iOS 主機將維持黑屏及不會顯示任何東西.
注意事項
由步驟 1.3 起, 須長按主目錄制直至步驟 1.6 完成才好放開. 另外, 進入 DFU 模式後及按回復之前, iOS 主機將維持黑屏及不會顯示任何東西.
# clean all rules
iptables -F
iptables -t nat -F
iptables -X
iptables -Z

#default chain
iptables -P INPUT DROP
iptables -P OUTPUT ACCEPT
iptables -P FORWARD ACCEPT
iptables -t nat -P  PREROUTING ACCEPT
iptables -t nat -P      OUTPUT ACCEPT
iptables -t nat -P POSTROUTING ACCEPT

iptables -A INPUT -s 10.0.0.0/8 -p tcp --dport 22 -j ACCEPT
iptables -A INPUT -p tcp --dport 22 -j ACCEPT

#modify rule below this line
iptables -t nat -A PREROUTING -p tcp --dport 80 -j DNAT --to-destination 10.140.0.3:80
iptables -t nat -A PREROUTING -p tcp --dport 3389 -j DNAT --to-destination 10.140.0.3:3389
iptables -t nat -A POSTROUTING -j MASQUERADE

iptables -L -n -t nat


